Wp Sorry That Key Has Expired Please Try Again
The "link you followed has expired" is a common error that occurs when trying to upload themes and plugins via the WordPress dashboard.
The error usually happens when the file y'all're trying to upload is larger than the default upload and execution limits ready by WordPress. The best mode to fix the issue is to increase the default upload limits.
In this guide, nosotros'll show you how to fix the "link you followed has expired" all by yourself in a few easy steps.
What Causes 'The Link You Followed Has Expired' Error?
If you were to open up the WordPress dashboard and go to Media >> Add New folio, y'all'll notice that by default WordPress has a fixed upload size limit that prevents yous from uploading files of larger sizes.
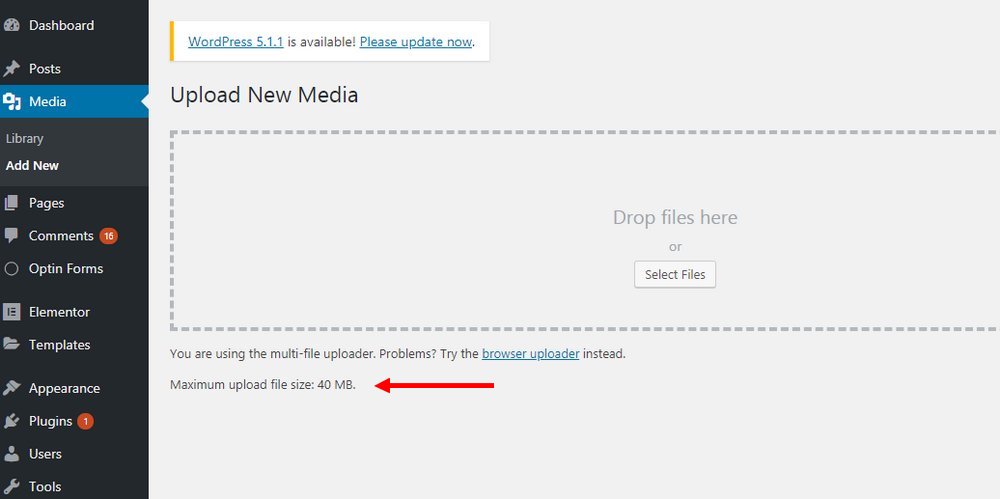
These prefixed sizes differ based on the type of web hosting plan you use. While managed WordPress hosting providers set over 100mb as the maximum upload size limit, smaller shared hosting plans may limit the size to 25mb. This limit is usually what keeps yous from uploading heavy themes and plugins.
Even if your website has a bigger upload size limit, if your website's maximum execution time is limited, then WordPress will often fail to upload larger files. This is when you meet fatal errors and other specific bug like "link you followed has expired" fault.
How To Set up The Error
To gear up the "link you followed has expired" error, all you need to practice is to increase the maximum upload size and execution times for your website.
This requires editing a core WordPress file and copying a few lines of code. Information technology can be washed in several unlike ways. We'll walk y'all through the process. Call up not to follow all these methods. If one method didn't work, reverse the changes you've made and try the adjacent method. Non all at once!
Note: Backup your website and make copies of files earlier making any changes to the core WordPress files. Follow this guide to learn how to setup WordPress backups. If you don't know what yous're doing, seek help from an good.
Method 1: Edit .htaccess File
The .htaccess file is a core file used by WordPress. We tin edit this file and copy our code to alter the default upload limits set past WordPress.
To edit the file, you lot need to access the WordPress files in your server. We'll show yous how to admission the server using the CPanel. Only, you tin also use an FTP customer app besides.
Stride 1: Login To CPanel
If y'all can't discover the CPanel via your hosting account, simply type "cpanel" at the end of your website domain name (eg: yourwebsite.com/cpanel).
Then enter the CPanel username and password. These details are usually provided to you in the welcome email your hosting provider sends to yous.
Step 2: Find And Open The File Managing director
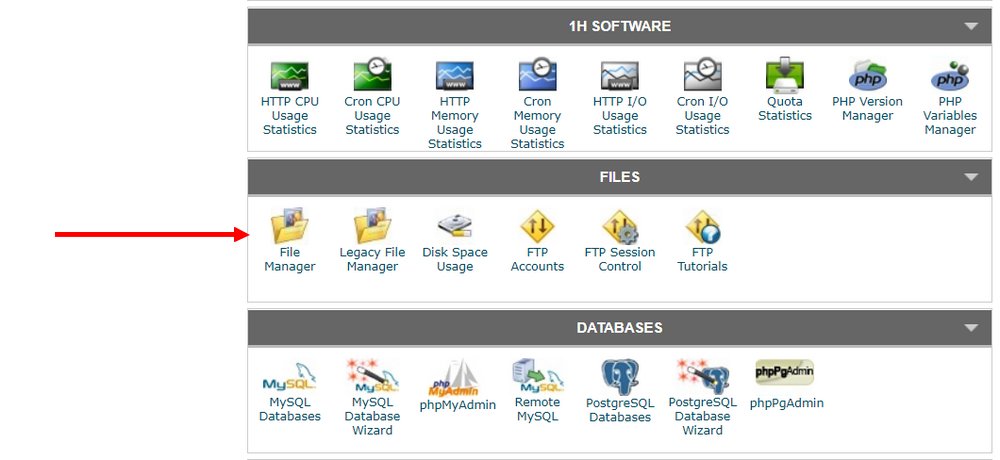
In the CPanel, find and open up the File Manager app. Then it will prompt you where you desire to navigate to. Choose to open the public.html folder.
Step 3: Copy The Code
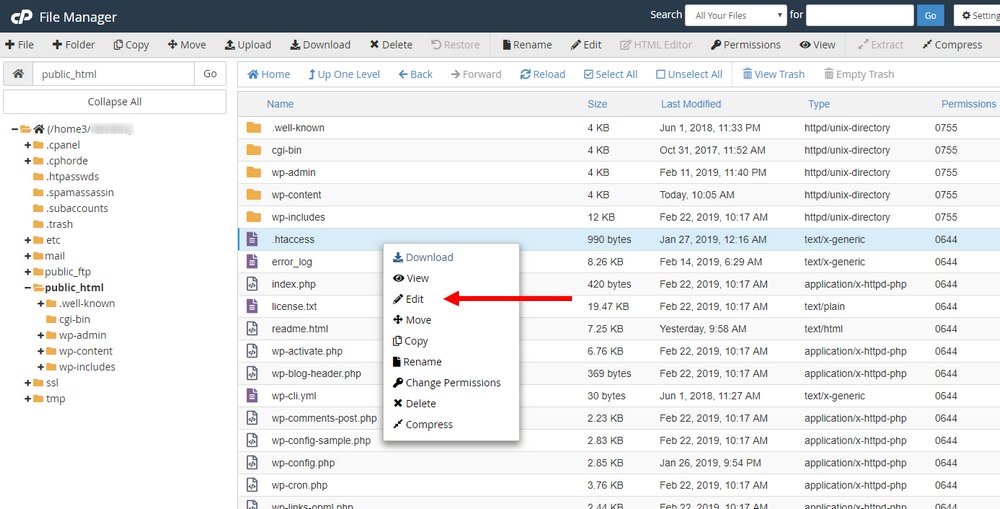
On the public.html folder y'all'll see the .htaccess file. Right-click on this file and choose Edit.
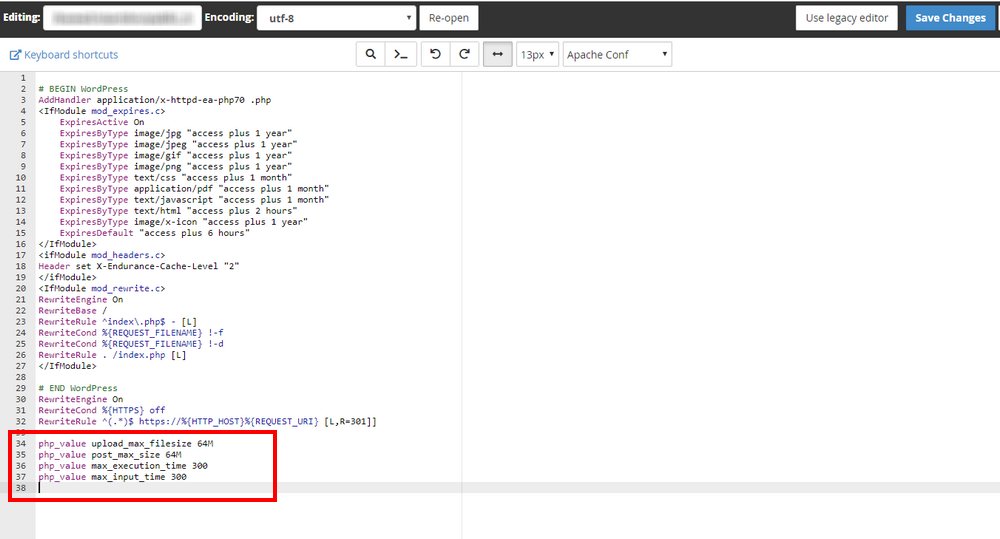
Then copy and paste the following lines of code at the finish of the .htaccess file
php_value upload_max_filesize 64M
php_value post_max_size 64M
php_value max_execution_time 300
php_value max_input_time 300
One time y'all're washed, click Salvage.
This method normally fixes the error. If it didn't work, try the next method.
Method 2: Create A PHP.ini File
If editing the .htaccess file didn't work, you tin can create and upload a PHP.ini file into your server to gear up the effect.
Some hosting servers will automatically create a PHP.ini file in your server. Follow the steps detailed in the previous method to navigate to the public.html folder in your server and see if in that location's already a PHP.ini file in your server.
If not, permit's create 1.
Step 1: Create A PHP.ini file
The PHP.ini file has to be created locally on your computer and and so you can upload it to your server.
First, open a bare notepad and copy and paste the following lines of code into information technology.
upload_max_filesize = 64M
post_max_size = 64M
max_execution_time = 300
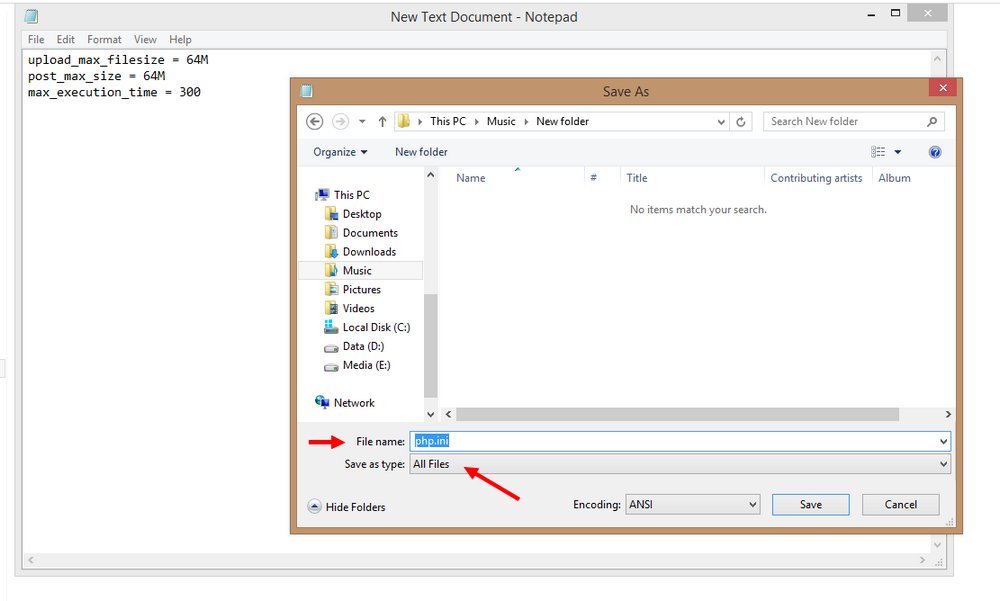
Then Save the note file as php.ini and choose file type as "All Files"
Footstep ii: Upload The File
Navigate back to your server and get to the public.html folder. And so upload the PHP.ini file that you've just created on your computer.
This will fix the error and increase the upload size limits to 64MB.
In Decision
These methods should help fix the issue and permit yous to upload themes and plugins with larger sizes through the WordPress dashboard.
Still, some shared hosting providers may have restrictions that will prevent you from uploading big files. If the issue persists, contact your web hosting provider and ask for their aid.
In the future, use an FTP client app like Filezilla to directly access your server and upload themes and plugins using the FTP client for easily uploading larger files.
Source: https://www.wpkube.com/how-to-fix-the-link-you-followed-has-expired-error-in-wordpress/
0 Response to "Wp Sorry That Key Has Expired Please Try Again"
Post a Comment